![]()

Worship the LORD in the beauty of holiness.
![]()
The Zig-Zag Lines
To make the "Zig-Zag" lines, I cut 16 pieces of string about 90 inches long (for the 13-inch gourd). For the 10-inch gourd, I used 12 pieces. For this tutorial, I will assume we are working with 12 lines.
Set the gourd on a stool or small table. Put the neck ring on the gourd.
Tie the center of each "Zig-Zag" line to the neck ring, spacing them evenly around. This gives you twice as many strings hanging down, half as long as before.
(To space them evenly, start with one on each side first, directly opposite each other... i.e. at 12 o'clock and 6 o'clock. You can then tie lines at 9 o'clock and 3 o'clock, etc.)Double check: we have a painted gourd sitting on a stool with a braided neck ring on it, and 12 long strings tied in such a way as to create 24 strings hanging down. Are you there?
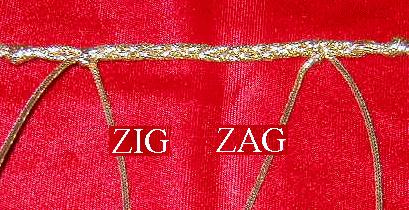
Okay, here come the beads. Take two strings, each hanging from a different knot. Call the one coming from the left "ZIG," and the one from the right "ZAG."
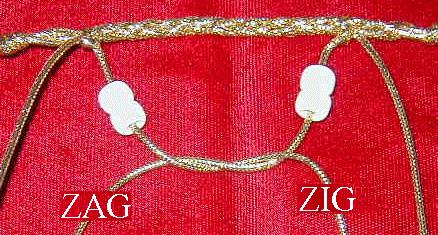
Next load the beads that will go at this location. Now repeat after me... "Zig crosses over Zag, then we pull Zig up and through." It will look like this.
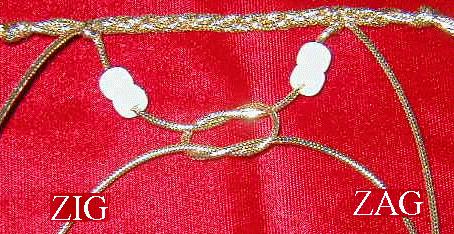
Zig and Zag have switched places, but the same thing works again. "Zig crosses over Zag, then we pull Zig up and through." Now it looks like this.
At this point you can make adjustments so that the knot winds up right where you want it. Although the knots can be worked open, it's easier if you get it right while pulling tight the first time.
Repeat this process all around the gourd until you reach the base of the shekere. Then it's time for the tail.
On to Page 5
Index - Ingredients - Neck Ring - Zig-Zag Lines - Tail
Copyright 1999 Steve Mugglin
Permission is given to make not-for-profit copies.