Important Update: This page, though written a number of years ago, has been receiving enough attention that we decided to create a better resource for beginning keyboard players. We are developing a series of eBooks especially for this purpose. Some are available already. If you are looking to learn about chords and chord progressions, we invite you to visit the new page. The link is...
First Steps in Keyboard PDF eBook Series
A Word Of Encouragement
I encourage everyone to consider playing more than one instrument. Although you will probably always have a "main instrument" or "first choice," the joy and fun of experimenting with new instruments keeps your perspective fresh.
The challenge when learning extra instruments is to learn efficiently, because most of your music time (rehearsing, writing, performing) involves using your main instrument. So how can you fit these other instruments "into the cracks?"
Here's how. First, understand the concepts that govern the instrument. Second, understand the fingering or patterns that allow you to experiment freely. And third, use it to do "simple and effective" things. The reason I say "simple and effective" is because these are secondary instruments for you. It's not necessary to master complicated phrases on each one... you only need to learn enough to enjoy what you are doing, and to play simply and effectively.
The Distraction, the Hill, and the Reward
The "Distraction" is you might get so interested in secondary instruments that you lose focus on the main challenge which has been given to you. Commit to keeping first things first. Hold on to what is most important. But then, with the little bits of time you have here and there, open up to the possibility of new things.
The "Hill" is the feeling you will get when trying something new. It's highly likely you will feel very unqualified, like a beginner, etc. If you've gotten used to how good you feel when playing your "real instrument," you might not like this "new" feeling of being back at square one. You may even experience the thought, "How does anyone ever play this thing?"
The "Reward" comes when you've experimented enough to get past the beginning stages to where music starts to flow... maybe just a phrase here and there, but it begins to sound like something real... and you will begin to think, "Maybe I can get this after all." It's a good feeling, and it opens up your musical world.
With this reward in mind, let's explore first steps in other instruments. We'll begin with keyboards.
First Steps In Keyboard
There is one very simple keyboard style that you can learn in a relatively short amount of time. It's especially effective as a simple accompaniment to a singer, which means as a songwriter you'll enjoy this kind of playing. Here are the main concepts...
Keyboard Concept #1
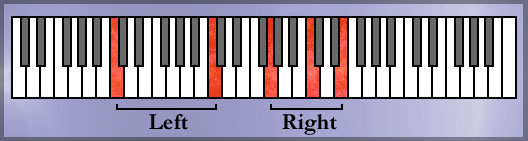
Bass in the left hand... chord in the right... melody in the voice.In this style, your left hand will be playing just the bass note. Sometimes it will be literally just one note, and sometimes it will be two notes with the same name played an octave apart.
The right hand chord will be somewhere in the middle of the keyboard, usually around middle C. The chord in the right hand will most often be three notes (though it can sometimes be only two notes, and sometimes four.)
Keyboard Concept #2
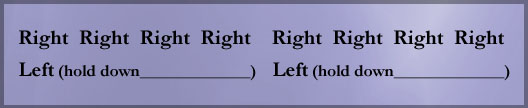
Right hand on each beat... left hand on beat one...On beat one of each measure, both your right hand and your left hand will come down together. Your left hand will then remain down, holding the bass note, while the right hand lifts up and then plays the same chord a few more times. You can try this exercise right now. Count to four over and over... 1, 2, 3, 4, 1, 2, 3, 4, etc. Start with your left hand. Allow it to drop onto the desk, or your lap, when you say 1, and then don't pick it up again until just after you say 4. Allow it to drop again immediately as you say the next 1. When you can do that comfortably, allow your right hand to hit the desk or your lap on each number.
Keyboard Concept #3
The Sustain PedalAfter learning the basic pattern in Keyboard Concept #2, you will find something is still missing... the sustain pedal (on a piano it's the pedal on the right). This pedal allows the notes to play longer, giving a smoother sound. The idea here is that the pedal should go "up" when a chord change occurs, and then back down again just after the new chord has been established. For example, if you are playing a C major chord using the pattern just described, and you switch to an F chord, the pedal goes up when the chord changes, and then back down just after the change. It takes a little getting used to, but it becomes natural and easy after a while.
Keyboard Concept #4
Relaxing... hand positions... fingering... numbering.Be sure to relax with a very natural approach. Sit up straight, but not stiffly. Rest your mind and your muscles. Let go of any tensions you may be feeling.
Your hand should look like it's resting on top of a ball. When the notes are close together, your hand may look like it's resting on a tennis ball. As the notes get more widely spaced, it may look like your hand is resting on a volleyball or basketball.
When playing a chord, use the fingering that allows your hand to stay as comfortable and rested as possible. On three note chords, I teach my students to play the outside notes with the thumb and little finger. The third note, the one in the middle of the chord, is played by whichever finger is closest (usually the index or the middle finger.) Also, allow the fingers which are not playing to relax as well. These should still look like they are resting on a ball, though they will be slightly above the keys.
We number the fingers 1, 2, 3, 4, 5 beginning with the thumb as number 1.
Keyboard Concept #5
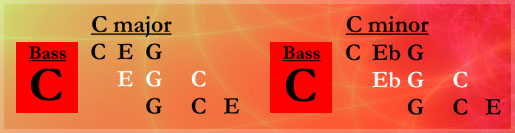
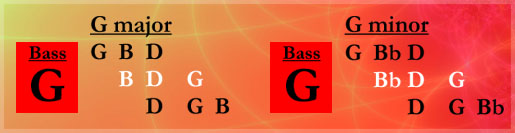
Learn the 72 chords.To get started you'll need to learn 12 major chords and 12 minor chords, each with three right hand ways of playing them (which adds up to 72 chords). This is your challenge. It may take a couple weeks, or it may take a few months. Either way, accept the challenge, and play these chords over and over again. As you play them, learn their names as well.
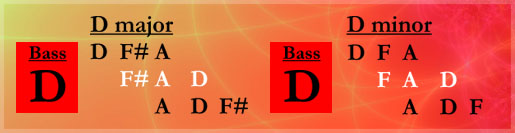
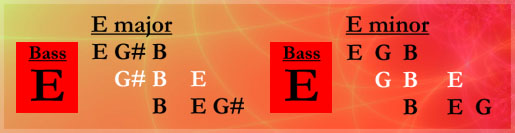
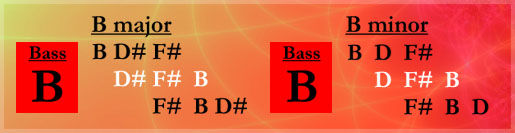
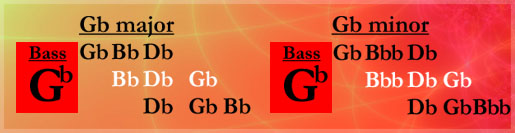
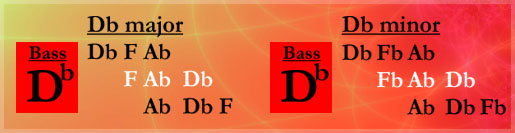
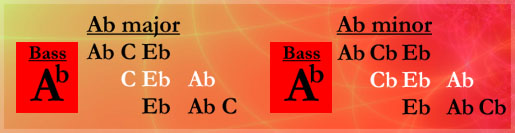
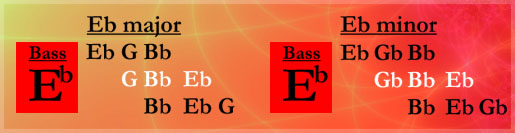
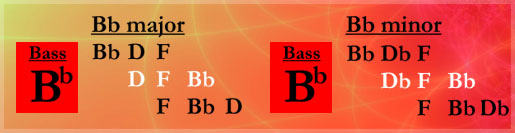
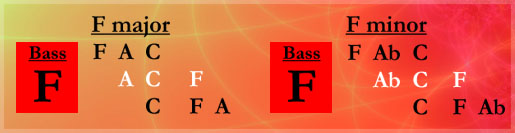
The diagrams below illustrate the major and minor chords for each root. The left hand plays the note in the red box as a bass note. The right hand has three choices. It's important to learn all three.
When the right hand chord is shown with white letters, the suggested fingering is 1-2-5, or thumb-index-little. When the right hand chord is shown with black letters, the suggested fingering is 1-3-5, or thumb-middle-little.
Update: As of 2014, we have another resource to help you learn the 72 chords. First Steps in Keyboard - Part 1 - Learn to Play 72 Chords is a 46-page eBook with diagrams showing each of the 72 chords and which notes are played for each one. The eBook is in pdf format. It can be viewed on your computer screen or on a tablet that reads pdf documents, or you can print whichever pages you are working on. For more information, follow this link.
First Steps in Keyboard PDF eBook Series
Keyboard Concept #6
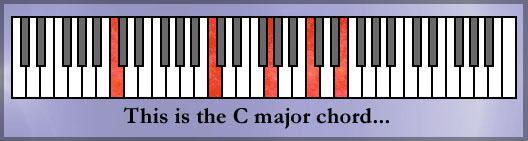
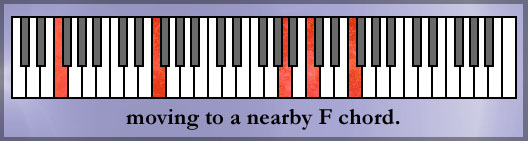
The "Close-To-Your-Hand" ConceptYou may be wondering why you need to learn three ways to play each chord. Wouldn't it be enough to learn just one C chord and use it every time the music calls for a C chord? The answer is... you could, but it will sound better and smoother if your right hand moves to a C chord which is in close proximity to the chord you just played. Having learned three ways, you will have options, and one of those options will be "close to your hand." It's not necessary to always choose the closest variation, but it's a good idea most of the time.
Here's an example. Suppose you are playing a C chord, and then an F chord. The nearest F chord is not far away. Moving your right hand from the C to the nearby F chord makes for a smooth transition.
Keyboard Concept #7
The bass can play another note in the chord.When you first learn, you should probably choose the bass note to be the same as the chord letter name. After a while, you may begin experimenting by playing in the bass a different note from the same chord. For example, when playing a C chord, try playing an E in the bass.
(A little bit about names - In music theory, we call the notes in the chord the root, the third, and the fifth. In a C major chord, the root is C, the third is E, and the fifth is G. When you play a chord with its third in the bass, we call this the "first inversion." When you play a chord with its fifth in the bass, we call this the "second inversion.")
Keyboard Concept #8
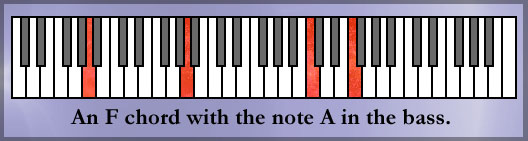
When playing a major chord with its third in the bass (first inversion),
omit the third from the right hand unless it's the highest note.This may seem like a small detail, but it will make your music sound better and more polished if you omit the third from the right hand when the third is in the bass. Example: when playing an F chord in the right hand, don't play the note A in the right hand (play only the F and the C) if you have chosen to put the A in the bass.
The only applies to major chords. You can put thirds in the bass with minor chords without changing the right hand.
Let's Review
In this section we considered the idea of adding some keyboard skills to your playing. We chose a simple songwriting style with the right hand playing a simple major or minor chord on each beat, and the left hand playing the bass as either a single note or as an octave.
We learned 72 chords, paying close attention to the fingering suggestions. We also learned that the bass note can play a chord note other than the root, and in particular, if the bass is on the third of a major chord, it's quite common to leave the third out of the right hand.
Enjoy learning these keyboard skills. Next stop... Part 10.
Index - Part 1 - Part 2 - Part 3 - Part 4 - Part 5 - Charts and Maps
Part 6 - Part 7 - Part 8 - Part 9 - 1st Steps in Keyboard - Part 10
Part 11 - Part 12 - 1st Steps in Note Reading
Copyright 2004 Steve Mugglin
Permission is given to make not-for-profit copies
of this material.